Yamaha YZF-R125 Owners Manual: Fuel
Make sure there is sufficient gasoline in the tank.
 WARNING
Gasoline and gasoline vapors are
extremely flammable. To avoid fires
and explosions and to reduce the
risk of injury when refueling, follow
these instructions.
- Before refueling, turn off the engine and be sure that no one is sitting on the vehicle. Never refuel while smoking, or while in the vicinity of sparks, open flames, or other sources of ignition such as the pilot lights of water heaters and clothes dryers.
- Do not overfill the fuel tank. Stop filling when the fuel reaches the bottom of the filler tube. Because fuel expands when it heats up, heat from the engine or the sun can cause fuel to spill out of the fuel tank.
-
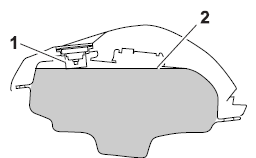
Fuel tank filler tube
-
Maximum fuel level
- Wipe up any spilled fuel immediately. NOTICE: Immediately wipe off spilled fuel with a clean, dry, soft cloth, since fuel may deteriorate painted surfaces or plastic parts.
- Be sure to securely close the fuel tank cap.
WARNING
Gasoline is poisonous and can
cause injury or death. Handle gasoline
with care. Never siphon gasoline
by mouth. If you should swallow
some gasoline or inhale a lot of gasoline
vapor, or get some gasoline in
your eyes, see your doctor immediately.
If gasoline spills on your skin,
wash with soap and water. If gasoline
spills on your clothing, change
your clothes.
| Recommended fuel: PREMIUM UNLEADED GASOLINE ONLY Fuel tank capacity: 13.8 L (3.65 US gal, 3.04 Imp.gal) Fuel reserve amount (when the fuel level warning indicator flashes): 1.6 L (0.42 US gal, 0.35 Imp.gal) |
NOTICE
Use only unleaded gasoline. The use
of leaded gasoline will cause severe
damage to internal engine parts,
such as the valves and piston rings,
as well as to the exhaust system.
Your Yamaha engine has been designed to use premium unleaded gasoline with a research octane number of 95 or higher. If knocking (or pinging) occurs, use a gasoline of a different brand. Use of unleaded fuel will extend spark plug life and reduce maintenance costs.
 Fuel tank cap
Fuel tank cap
Fuel tank cap lock cover
Unlock.
To remove the fuel tank cap
Open the fuel tank cap lock cover.
Insert the key into the lock and turn
it 1/4 turn counterclockwise. ...
 Catalytic converters
This vehicle is equipped with catalytic
converters in the exhaust system.
WARNING
The exhaust system is hot after operation.
To prevent a fire hazard or
burns:
Do not park the vehicle nea ...
Other materials:
Chain drive
Removing the drive chain
1. Stand the vehicle on a level surface.
WARNINGSecurely support the vehicle so that there
is
no danger of it falling over.
NOTE:
Place the vehicle on a suitable stand so that the
rear wheel is elevated. ...
Replacing the air filter element and cleaning the check hose
The air filter element should be replaced
at the intervals specified in the
periodic maintenance and lubrication
chart. Have a Yamaha dealer replace
the air filter element more frequently if
you are riding in unusually wet or dusty
areas. In addition, the air filter check
hose must be ...
Installing the drive chain
1. Lubricate:
Drive chain
Master link
2. Install:
Drive sprocket
Drive sprocket retainer bolts
3. Install:
Master link
O-rings
Master link plate
Master link clip "1"
CAUTION:
The closed end of the master link clip must
face in the direction of drive ch ...