Yamaha YZF-R125 Service Manual: Checking the fuel line
1. Remove:
- Left side panel Refer to "GENERAL CHASSIS" on page 4-1.
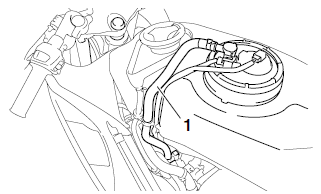
2. Lift the fuel tank. (Do not disconnect the fuel hose, drain hose
3. Check:
Fuel hose "1" Cracks/damage → Replace.
Loose connection Connect properly.
4. Install:
- Fuel tank Refer to "FUEL TANK" on page 7-1.
- Left side panel Refer to "GENERAL CHASSIS" on page 4-1.
 Checking the throttle body joint and air filter case joint
1. Remove:
Right lower side cowling
Left lower side cowling
Refer to "GENERAL CHASSIS" on page 4-1.
2. Check:
Throttle body joint "1"
Air filter case joint "2"
Cracks/damage Replace ...
 Checking the cylinder head breather hose
1. Remove:
Left side panel
Refer to "GENERAL CHASSIS" on page 4-1.
2. Check:
Cylinder head breather hose "1"
Cracks/damage → Replace.
Loose connection → Connect properly ...
Other materials:
Troubleshooting method
The engine operation is not normal and the
engine trouble warning light comes on.
1. Check:
Fault code number
a. Check the fault code number displayed on
the FI diagnostic tool.
b. Identify the faulty system with the fault code.
Refer to "Self-Diagnostic Function table".
c. Identi ...
Installing the drive chain
1. Lubricate:
Drive chain
Master link
2. Install:
Drive sprocket
Drive sprocket retainer bolts
3. Install:
Master link
O-rings
Master link plate
Master link clip "1"
CAUTION:
The closed end of the master link clip must
face in the direction of drive ch ...
Checking the cylinder head
1. Eliminate:
Combustion chamber carbon deposits
(with a rounded scraper)
NOTE:
Do not use a sharp instrument to avoid damaging
or scratching:
Spark plug bore threads
Valve seats
2. Check:
Cylinder head
Damage/scratches Replace.
Cylinder head water jacket
Min ...