Yamaha YZF-R125 Owners Manual: Replacing the fuses
Replacing the fuses
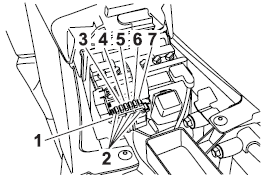
- Fuse box
- Spare fuse
- Headlight fuse
- Signaling system fuse
- Ignition fuse
- Radiator fan fuse
- Main fuse
The fuse box is located under the rider seat.
If a fuse is blown, replace it as follows.
- Turn the key to "OFF" and turn off the electrical circuit in question.
- Remove the blown fuse, and then install a new fuse of the specified amperage. WARNING! Do not use a fuse of a higher amperage rating than recommended to avoid causing extensive damage to the electrical system and possibly a fire.
| Specified fuses: Main fuse: 20.0 A Ignition fuse: 7.5 A Signaling system fuse: 7.5 A Headlight fuse: 15.0 A Radiator fan fuse: 5.0 A |
- Turn the key to "ON" and turn on the electrical circuit in question to check if the device operates.
- If the fuse immediately blows again, have a Yamaha dealer check the electrical system.
 Battery
A poorly maintained battery will corrode
and discharge quickly. The electrolyte
level, battery lead connections and
breather hose routing should be
checked before each ride and at the interval ...
 Replacing a headlight bulb
This model is equipped with quartz bulb
headlights. If a headlight bulb burns
out, have a Yamaha dealer replace it
and, if necessary, adjust the headlight
beam. ...
Other materials:
Battery
A poorly maintained battery will corrode
and discharge quickly. The electrolyte
level, battery lead connections and
breather hose routing should be
checked before each ride and at the intervals
specified in the periodic maintenance
and lubrication chart.
WARNING
Electrolyte is pois ...
Installing the swingarm
1. Lubricate:
Bearings
Spacers
Dust covers
Pivot shaft
2. Install:
Bearings "1"
2. Swingarm
A. Left side
B. Right side
3. Install:
Swingarm adjusting collar "1"
Swingarm "2"
Pivot shaft
Pivot shaft nut "3"
a. Install, and then fully turn in the swingarm adju ...
Replacing the headlight bulbs
The following procedure applies to the low beam
headlight bulb.
1. Remove:
Headlight bulb cover "1"
2. Remove:
Headlight bulb holder "1"
3. Remove:
Headlight bulb "1"
WARNINGSince the headlight bulb gets extremely
hot,
keep flammable products and your ...