Yamaha YZF-R125 Owners Manual: Replacing an auxiliary light bulb
This model is equipped with two auxiliary lights. If an auxiliary light bulb burns out, replace it as follows.
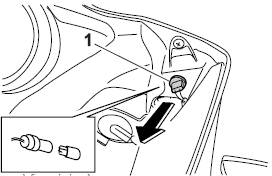
- Remove the socket (together with the bulb) by pulling it out.
-
Auxiliary light bulb
- Remove the burnt out bulb by pulling it out.
- Insert a new bulb into the socket.
- Install the socket (together with the bulb) by pushing it in.
 Replacing the license plate light bulb
Remove the socket (together with
the bulb) by pulling it out.
License plate light bulb
Remove the burnt-out bulb by pulling
it out.
Insert a new bulb into the socket.
...
 Supporting the motorcycle
Since this model is not equipped with a
centerstand, follow these precautions
when removing the front and rear
wheel or performing other maintenance
requiring the motorcycle to stand upright. ...
Other materials:
Adjusting the exhaust gas volume
NOTE:
Be sure to set the CO density level to standard,
and then adjust the exhaust gas volume.
1. Remove:
Rider seat
Refer to "GENERAL CHASSIS" on page 4-1.
2. Set the main switch to "OFF".
3. Disconnect:
Self-diagnosis signal connector "1"
4. Connect:
FI diagnostic tool "2 ...
General information
NOTICEThis manual was produced by MBK Industrie.
primarily for use by Yamaha dealers and their qualified
mechanics. It is not possible to include all the knowledge of a mechanic
in one manual. Therefore, anyone
who uses this book to perform maintenance and repairs on Yamaha vehi ...
Storage
Short-term
Always store your motorcycle in a cool,
dry place and, if necessary, protect it
against dust with a porous cover.
NOTICE
Storing the motorcycle in a
poorly ventilated room or covering
it with a tarp, while it is still
wet, will allow water and humidity
to seep in and ...