Yamaha YZF-R125 Owners Manual: Multi-function display
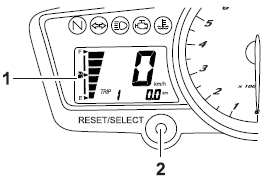
Multi-function display
- Multi-function display
- "RESET/SELECT" button
 WARNING
Be sure to stop the vehicle before
making any setting changes to the
multi-function display. Changing
settings while riding can distract the
operator and increase the risk of an
accident.
The multi-function display is equipped with the following:
- a speedometer (which shows the riding speed)
- an odometer (which shows the total distance traveled)
- two tripmeters (which show the distance traveled since they were last set to zero)
- a fuel reserve tripmeter (which shows the distance traveled since the fuel level warning light came on)
- a fuel meter
TIP
- Be sure to turn the key to "ON" before using the "RESET/ SELECT" button.
- For the U.K. only: To switch the speedometer and odometer/tripmeter displays between kilometers and miles, press the "RESET/SELECT" button for at least eight seconds.
Odometer and tripmeter modes
A brief push (less than one second) on the "RESET/SELECT" button switches the display between the odometer mode "ODO" and the tripmeter modes "TRIP 1" and "TRIP 2" in the following order:
ODO → TRIP 1 → TRIP 2 → ODO
When approximately 1.6 L (0.42 US gal, 0.35 Imp.gal) of fuel remains in the fuel tank, the odometer display will automatically change to the fuel reserve tripmeter mode "F-TRIP" and start counting the distance traveled from that point, and the last segment of the fuel meter will start flashing. In that case, pushing the "RESET/SELECT" button switches the display between the various tripmeter and odometer modes in the following order:
F-TRIP → TRIP 1 → TRIP 2 → ODO → F-TRIP
To reset a tripmeter, select it by pushing the "RESET/SELECT" button briefly (less than one second), and then push the button again for at least three seconds while the selected tripmeter is flashing. If you do not reset the fuel reserve tripmeter manually, it will reset itself automatically and the display will return to the prior mode after refueling and traveling 5 km (3 mi).
Fuel meter
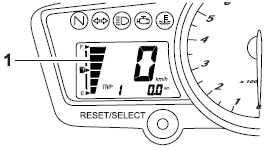
Fuel meter
- Fuel meter
The fuel meter indicates the amount of fuel in the fuel tank. The display segments of the fuel meter disappear towards "E" (Empty) as the fuel level decreases. When the last fuel meter segment starts flashing, refuel as soon as possible.
 Tachometer
Tachometer
Tachometer
Tachometer red zone
The electric tachometer allows the rider
to monitor the engine speed and keep it
within the ideal power range.
When the key is turned to "ON ...
 Handlebar switches
Left
Left
1. Pass switch "PASS"
2. Dimmer switch "/"
3. Turn signal switch "/"
4. Horn switch""
Right
Right
Engine stop switch "/"
Start switch""
Pass switch "PASS"
Press t ...
Other materials:
Adjusting the clutch cable free play
1. Check:
Clutch cable free play "a"
Out of specification Adjust.
2. Adjust:
Clutch cable free play
a. Pull back the rubber cover "1"
b. Loosen the locknut "2".
c. Turn the adjusting bolt "3" in direction "a" or
"b" until the specified clutch cable free play is
obtained.
...
Checking the shift drum assembly
1. Check:
Shift drum groove
Damage/scratches/wear Replace
the shift
drum assembly.
Shift drum segment "1"
Damage/wear Replace the
shift drum assembly.
Shift drum bearing "2"
Damage/pitting Replace the
shift drum assembly.
...
Checking the horn
1. Check:
Horn resistance
Out of specification Replace.
a. Disconnect the horn connectors from the
horn terminals.
b. Connect the pocket tester ( × 1) to the horn
terminals.
Positive tester probe
horn terminal "1"
Negative tester probe
horn terminal "2"
c. Measure t ...