Yamaha YZF-R125 Service Manual: Checking the rear wheel
1. Check:
- Rear wheel axle
- Rear wheel
- Wheel bearings
- Oil seals Refer to "CHECKING THE FRONT WHEEL" on page 4-8.
2. Check:
- Tire
- Rear wheel Damage/wear → Replace.
Refer to "CHECKING THE TIRES" on page 3-23 and "CHECKING THE WHEELS" on page 3-25.
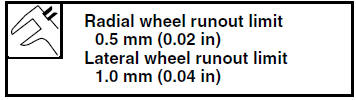
3. Measure:
- Radial wheel runout
- Lateral wheel runout
Refer to "CHECKING THE FRONT WHEEL"
on page 4-8.
Checking the rear brake caliper bracket
1. Check:
- Rear brake caliper bracket Cracks/damage → Replace.
Checking the rear wheel drive hub
1. Check:
- Rear wheel drive hub Cracks/damage → Replace.
- Rear wheel drive hub dampers Damage/wear → Replace.
 Removing the rear wheel (disc)
1. Stand the vehicle on a level surface.
WARNINGSecurely support the vehicle
so that there is
no danger of it falling over.
2. Elevate:
Rear wheel
NOTE:
Place the vehicle ...
 Checking and replacing the rear wheel sprocket
1. Check:
Rear wheel sprocket
More than 1/4 tooth "a" wear
Replace the
rear wheel sprocket.
Bent teeth Replace the rear
wheel sprocket.
b. Correct
1. Drive chain roller
2. ...
Other materials:
Removing the front wheel (disc)
1. Stand the vehicle on a level surface.
WARNINGSecurely support the vehicle so that there
is
no danger of it falling over.
2. Elevate:
Front wheel
NOTE:
Place the vehicle on a suitable stand so that the
front wheel is elevated.
3. Remove:
Front brake caliper
NO ...
Checking and replacing the rear wheel sprocket
1. Check:
Rear wheel sprocket
More than 1/4 tooth "a" wear
Replace the
rear wheel sprocket.
Bent teeth Replace the rear
wheel sprocket.
b. Correct
1. Drive chain roller
2. Rear wheel sprocket
2. Replace:
Rear wheel sprocket
a. Remove the self-locking nuts and the ...
Checking the fid (fast idle solenoid)
1. Disconnect:
FID (fast idle solenoid) coupler
2. Check:
FID (fast idle solenoid) resistance
a. Disconnect the FID (fast idle solenoid) coupler
from the FID.
b. Connect the pocket tester ( × 10)
to the terminals
of the FID (fast idle solenoid).
Positive tester probe ...