Yamaha YZF-R125 Service Manual: Removing the handlebars
1. Stand the vehicle on a level surface.
| WARNING Securely support the vehicle so that there is no danger of it falling over. |
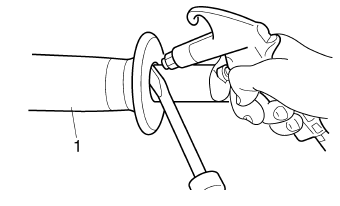
2. Remove:
- Handlebar grip "1"
NOTE:
Blow compressed air between the handlebar and the handlebar grip, and gradually push the grip off the handlebar.
 Handlebars
...
 Checking the handlebars
1. Check:
Left handlebar
Right handlebar
Bends/cracks/damage → Replace.
WARNINGDo not attempt to straighten a bent
handlebar
as this may dangerously weaken it.
...
Other materials:
Be a Responsible Owner
As the vehicle's owner, you are responsible
for the safe and proper operation
of your motorcycle.
Motorcycles are single-track vehicles.
Their safe use and operation are dependent
upon the use of proper riding
techniques as well as the expertise of
the operator. Every operator should
...
Checking the fuel pressure
1. Check:
Pressure regulator operation
a. Remove the fuel hose connector cover "1"
and disconnect the fuel hose "2" from the fuel
pump.
CAUTION:Although the fuel has been removed from
the fuel tank, be careful when removing the
fuel hose, since there may be fuel remaining
i ...
Checking the speed sensor
1. Check:
Speed sensor output voltage
Out of specification → Replace.
a. Connect the pocket tester (DC 20 V) to the
speed sensor coupler (wire harness end) as
shown.
Positive tester probe
gray "1"
Negative tester probe
gray/black "2"
b. Set the main switch to "ON".
c. ...