
Yamaha YZF-R125 Owners Manual: Replacing the license plate light bulb
- Remove the socket (together with the bulb) by pulling it out.
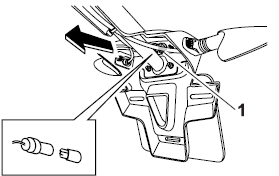
-
License plate light bulb
- Remove the burnt-out bulb by pulling it out.
- Insert a new bulb into the socket.
- Install the socket (together with the bulb) by pushing it in.
 Replacing a turn signal light bulb
Remove the turn signal light lens
by removing the screw.
Screw
Remove the burnt-out bulb by
pushing it in and turning it counterclockwise.
Insert a new bulb into the so ...
 Replacing an auxiliary light bulb
This model is equipped with two auxiliary
lights. If an auxiliary light bulb burns
out, replace it as follows.
Remove the socket (together with
the bulb) by pulling it out.
Aux ...
Other materials:
Checking the coolant level
1. Stand the vehicle on a level surface.
NOTE:
Place the vehicle on a suitable stand.
Make sure the vehicle is upright.
2. Check:
Coolant level
The coolant level should be between the
maximum level mark "a" and minimum level
mark "b".
Below the minimum level mark → Add t ...
Checking the primary driven gear
1. Check:
Primary driven gear "1"
Damage/wear Replace the
primary drive
gear and clutch housing as a set.
Excessive noise during operation
Replace
the primary drive gear and clutch housing as
a set.
...
Installing the radiator
1. Fill:
Cooling system
(with the specified amount of the recommended
coolant)
Refer to "CHANGING THE COOLANT" on
page 3-15.
2. Check:
Cooling system
Leaks Repair or replace any
faulty part.
3. Measure:
Radiator cap opening pressure
Below the specified pressure Repla ...