Yamaha YZF-R125 Service Manual: Installing the front brake caliper
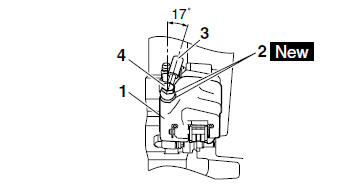
1. Install:
- Brake caliper "1" (temporarily)
- Copper washers "2"

- Brake hose "3"
- Brake hose union bolt "4"

| WARNING Proper brake hose routing is essential to insure safe vehicle operation. Refer to "CABLE ROUTING" on page 2-33. |
CAUTION:
|
2. Remove:
- Brake caliper
3. Install:
- Brake pad spring
- Brake pads
- Brake caliper
- Brake hose holder
Refer to "REPLACING THE FRONT BRAKE PADS" on page 4-22.
4. Fill:
- Brake master cylinder reservoir
(with the specified amount of the recommended
brake fluid)

WARNING
|
| CAUTION: Brake fluid may damage painted surfaces and plastic parts. Therefore, always clean up any spilt brake fluid immediately. |
5. Bleed:
- Brake system Refer to "BLEEDING THE HYDRAULIC BRAKE SYSTEM" on page 3-20.
6. Check:
- Brake fluid level
Below the minimum level mark "a"

Add the recommended brake fluid to the proper level.Refer to "CHECKING THE BRAKE FLUID LEVEL" on page 3-18.
7. Check:
Brake lever operation Soft or spongy feeling → Bleed the brake system.
Refer to "BLEEDING THE HYDRAULIC BRAKE SYSTEM" on page 3-20.
 Assembling the front brake caliper
WARNING
Before installation, all internal brake components
should be cleaned and lubricated
with clean or new brake fluid.
Never use solvents on internal brake components
as ...
 Removing the front brake master cylinder
NOTE:
Before removing the front brake master cylinder,
drain the brake fluid from the entire brake system.
1. Disconnect:
Front brake light switch
2. Remove:
Brake hose union bolt
Copp ...
Other materials:
Removing the fuel tank
1. Extract the fuel in the fuel tank through the
fuel tank filler hole with a pump.
2. Remove:
Fuel hose connector cover "1"
3. Disconnect:
Fuel hose "2"
CAUTION:
Be sure to disconnect the fuel hose by
hand. Do not forcefully disconnect the
hose with tools.
A ...
Adjusting the drive chain slack
NOTE:
The drive chain slack must be checked at the
tightest point on the chain.
CAUTION:A drive chain that is too tight will
overload
the engine and other vital parts, and one that
is too loose can skip and damage the swingarm
or cause an accident. Therefore, keep
the drive ...
Installing the radiator
1. Fill:
Cooling system
(with the specified amount of the recommended
coolant)
Refer to "CHANGING THE COOLANT" on
page 3-15.
2. Check:
Cooling system
Leaks Repair or replace any
faulty part.
3. Measure:
Radiator cap opening pressure
Below the specified pressure Repla ...