Yamaha YZF-R125 Service Manual: Checking the valves and valve guides
The following procedure applies to all of the valves and valve guides.
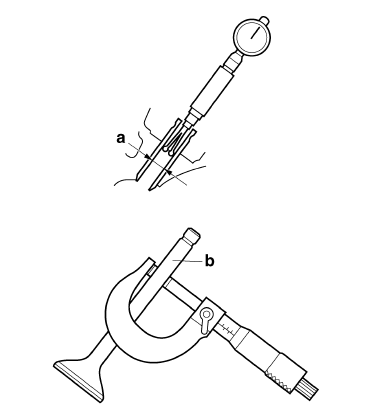
1. Measure:
- Valve-stem-to-valve-guide clearance
Out of specification
 Replace the
valve guide.
Valve-stem-to-valve-guide clearance =
Valve guide inside diameter "a" -
Valve stem diameter "b" 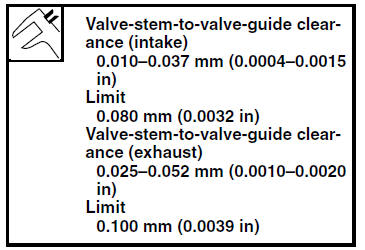
2. Replace:
- Valve guide
NOTE:
To ease valve guide removal and installation, and to maintain the correct fit, heat the cylinder head to 100 C (212 F) in an oven.
a. Remove the valve guide with the valve guide remover "1".
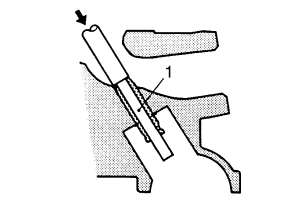
b. Install the new valve guide with the valve
guide installer "2" and valve guide remover
"1". 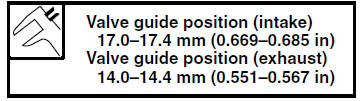
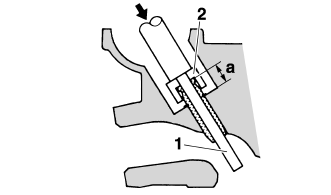
a. Valve guide position
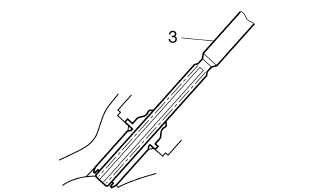
c. After installing the valve guide, bore the valve guide with the valve guide reamer "3" to obtain the proper valve-stem-to-valve-guide clearance.
NOTE:
After replacing the valve guide, reface the valve
seat. 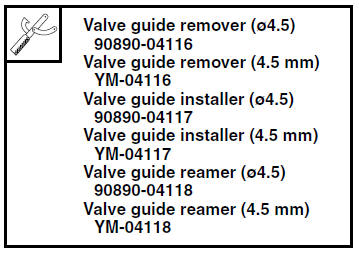
3. Eliminate:
- Carbon deposits (from the valve face and valve seat)
4. Check:
- Valve face
Pitting/wear
 Grind the valve
face. - Valve stem end
Mushroom shape or diameter larger than the
body of the valve stem
 Replace
the valve.
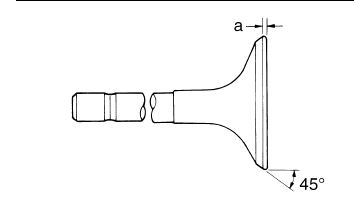
5. Measure:
- Valve margin thickness D "a"
Out of specification Replace
the valve.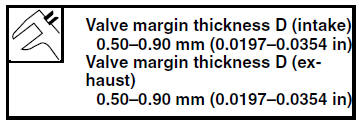
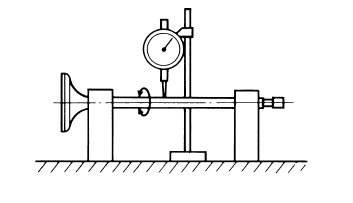
6. Measure:
- Valve stem runout
Out of specification Replace
the valve.
NOTE:
- When installing a new valve, always replace the valve guide.
- If the valve is removed or replaced, always replace
the valve stem seal.

 Removing the valves
The following procedure applies to all of the
valves and related components.
NOTE:
Before removing the internal parts of the cylinder
head (e.g., valves, valve springs, valve seats),
make sure th ...
 Checking the valve seats
The following procedure applies to all of the
valves and valve seats.
1. Eliminate:
Carbon deposits
(from the valve face and valve seat)
2. Check:
Valve seat
Pitting/wear Replace the ...
Other materials:
Checking the horn
1. Check:
Horn resistance
Out of specification Replace.
a. Disconnect the horn connectors from the
horn terminals.
b. Connect the pocket tester ( × 1) to the horn
terminals.
Positive tester probe
horn terminal "1"
Negative tester probe
horn terminal "2"
c. Measure t ...
Replacing the rear brake pads
NOTE:
When replacing the brake pads, it is not necessary
to disconnect the brake hose or disassemble
the brake caliper.
1. Remove:
Brake pads
Brake pad spring
NOTE:
To remove the inner brake pad "1", push down
on the brake caliper bracket so that there is
space to remove the brake pa ...
Checking the spark plug
1. Remove:
Right side cover
Refer to "GENERAL CHASSIS" on page 4-1.
2. Disconnect:
Spark plug cap
3. Remove:
Spark plug
CAUTION:Before removing the spark plug, blow away
any dirt accumulated in the spark plug well
with compressed air to prevent it from falling
...