Yamaha YZF-R125 Service Manual: Checking the coolant level
1. Stand the vehicle on a level surface.
NOTE:
- Place the vehicle on a suitable stand.
- Make sure the vehicle is upright.
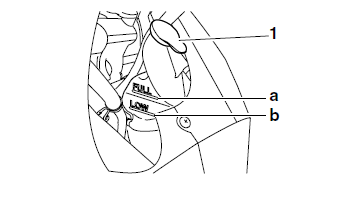
2. Check:
Coolant level The coolant level should be between the maximum level mark "a" and minimum level mark "b".
Below the minimum level mark → Add the recommended coolant to the proper level.
NOTE:
To access the coolant reservoir cap "1", remove the right side cover. Refer to "GENERAL CHASSIS" on page 4-1.
CAUTION:
|
3. Start the engine, warm it up for several minutes, and then turn it off.
4. Check:
- Coolant level
NOTE:
Before checking the coolant level, wait a few minutes until it settles.
 Checking the exhaust system
1. Check:
Exhaust assembly "1"
Cracks/damage → Replace.
Exhaust pipe gasket "2"
Exhaust gas leaks → Replace.
2. Check:
Tightening torques of the exhaust pipe nuts
"3" an ...
 Checking the cooling system
1. Remove:
Side covers
Upper side cowlings
Refer to "GENERAL CHASSIS" on page 4-1.
2. Check:
Radiator "1"
Radiator inlet hose "2"
Radiator outlet hose "3"
Coolant reservoir hose ...
Other materials:
Unstable handling
Handlebars
- Bent or improperly installed right handlebar
- Bent or improperly installed left handlebar
1. Steering head components
- Improperly installed upper bracket
- Improperly installed lower bracket
(improperly tightened ring nut)
- Bent steering stem
- Damaged ball bearing or bearing ...
Setting the diagnostic mode
1. Set the main switch to "OFF" and the engine stop switch to "
".
2. Disconnect the self-diagnosis signal connector "1", and then connect the FI
diagnostic tool "2" as
shown.
3. Disconnect the fuel pump coupler.
4. While pressing the "MODE" button, set the main switch to "ON".
NOTE:
...
Checking the piston rings
1. Measure:
Piston ring side clearance
Out of specification Replace the
piston
and piston rings as a set.
NOTE:
Before measuring the piston ring side clearance,
eliminate any carbon deposits from the piston
ring grooves and piston rings.
2. Install:
Piston ring
(into the cylind ...