Yamaha YZF-R125 Service Manual: Adjusting the throttle cable free play
NOTE:
Prior to adjusting the throttle cable free play, the engine idling speed should be adjusted.
1. Check:
- Throttle cable free play "a" Out of specification →Adjust.

2. Remove:
- Right side panel Refer to "GENERAL CHASSIS" on page 4-1.
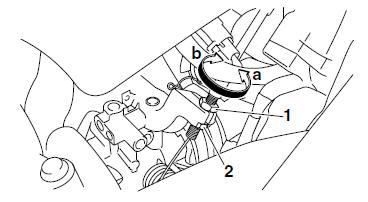
3. Adjust:
- Throttle cable free play
a. Loosen the locknut "1" on the accelerator cable.
b. Turn the adjusting nut "2" in direction "a" or "b" until the specified throttle cable free play is obtained.

c. Tighten the locknut. 
NOTE:
If the specified throttle cable free play cannot be obtained on the throttle body end of the cable, use the adjusting nut on the handlebar end.
a. Slide back the rubber cover "1".
b. Loosen the locknut "2".
c. Turn the adjusting nut "3" in direction "a" or "b" until the specified throttle cable free play is obtained.

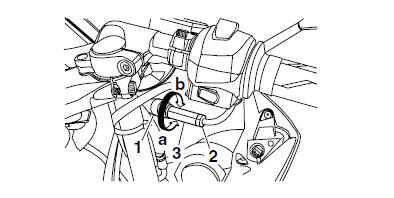
d. Tighten the locknut.
e. Slide the rubber cover to its original position.
| WARNING After adjusting the throttle cable free play, start the engine and turn the handlebar to the right or left to ensure that this does not cause the engine idling speed to change. |
4. Install:
- Right side panel Refer to "GENERAL CHASSIS" on page 4-1.
 Adjusting the engine idling speed
NOTE:
Prior to adjusting the engine idling speed, the air
filter element should be clean, and the engine
should have adequate compression.
1. Start the engine and let it warm up for several
minut ...
 Checking the spark plug
1. Remove:
Right side cover
Refer to "GENERAL CHASSIS" on page 4-1.
2. Disconnect:
Spark plug cap
3. Remove:
Spark plug
CAUTION:Before removing the spark plug, blow away
...
Other materials:
Installing the starter clutch
1. Install:
Starter clutch assembly
Starter clutch bolts "1"
NOTE:
While holding the generator rotor "2" with the
sheave holder "3", tighten the starter clutch
bolts.
Do not allow the sheave holder to touch the
projection on the generator rotor.
Stake the end "a" of each start ...
Installing the front fork legs
The following procedure applies to both of the
front fork legs.
1. Install:
Front fork leg
Temporarily tighten the upper and lower
bracket pinch bolts.
NOTE:
Make sure the inner tube end position "a" is 24.5
mm (0.96 in) from the top of the upper bracket.
2. Tighten:
Lower br ...
Checking the starter motor
1. Check:
Commutator
Dirt Clean with 600 grit
sandpaper.
2. Measure:
Commutator diameter "a"
Out of specification Replace
the starter
motor.
3. Measure:
Mica undercut "a"
Out of specification Scrape
the mica to the
proper measurement with a hacksaw blade
...