Yamaha YZF-R125 Owners Manual: Front wheel
To remove the front wheel
 WARNING
To avoid injury, securely support the
vehicle so there is no danger of it
falling over.
- Loosen the front wheel axle pinch bolt, then the wheel axle and the brake caliper bolts.
-
Front wheel axle pinch bolt
- Lift the front wheel off the ground according to the procedure.
- Remove the speed sensor lead holder by removing the bolt.
-
Speed sensor cable holder
- Remove the brake hose holder by removing the bolt.
- Remove the brake caliper by removing the bolts.
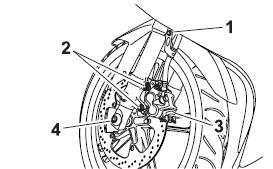
-
Brake hose holder
-
Brake caliper bolt
-
Brake caliper
-
Axle bolt
- Pull the wheel axle out, remove the speed sensor by pulling it out, and then remove the wheel. NOTICE: Do not apply the brake after the brake calipers have been removed, otherwise the brake pads will be forced shut.
-
Speedometer gear unit
To install the front wheel
- Lift the wheel up between the fork legs.
- Install the speed sensor at the wheel hub.
TIP
Make sure that the projections on the
speed sensor rotor are aligned with the
notches in the wheel hub and that the
slot in the speed sensor fits over the retainer
on the fork leg.
- Insert the wheel axle.
- Lower the front wheel so that it is on the ground.
- Push down hard on the handlebar several times to check for proper fork operation.
- Install the brake caliper by installing the bolts.
TIP
Make sure that there is enough space
between the brake pads before installing
the brake caliper onto the brake
disc.
- Install the brake hose holder by installing the bolt.
- Install the speed sensor lead holder by installing the bolt.
- Tighten the wheel axle, front wheel axle pinch bolt and brake caliper bolts to the specified torques.
| Tightening torques: Wheel axle: 59 Nm (5.9 m.kgf, 43 ft.lbf) Front wheel axle pinch bolt: 14 Nm (1.4 m.kgf, 10 ft.lbf) Brake caliper bolt: 30 Nm (3.0 m.kgf, 22 ft.lbf) |
 Supporting the motorcycle
Since this model is not equipped with a
centerstand, follow these precautions
when removing the front and rear
wheel or performing other maintenance
requiring the motorcycle to stand upright. ...
 Rear wheel
To remove the rear wheel
WARNING
To avoid injury, securely support the
vehicle so there is no danger of it
falling over.
Loosen the axle nut.
Axle nut
Drive chain slack adjust ...
Other materials:
Supporting the motorcycle
Since this model is not equipped with a
centerstand, follow these precautions
when removing the front and rear
wheel or performing other maintenance
requiring the motorcycle to stand upright.
Check that the motorcycle is in a
stable and level position before starting
any maintenance. A ...
Checking the swingarm
1. Check:
Swingarm
Bends/cracks/damage
Replace.
2. Check:
Pivot shaft
Roll the pivot shaft on a flat surface.
Bends Replace.
WARNINGDo not attempt to straighten a bent pivot
shaft.
3. Wash:
Pivot shaft
Washer
Swingarm adjusting collar
Du ...
Checking the fuel line
1. Remove:
Left side panel
Refer to "GENERAL CHASSIS" on page 4-1.
2. Lift the fuel tank. (Do not disconnect the fuel
hose, drain hose
3. Check:
Fuel hose "1"
Cracks/damage → Replace.
Loose connection Connect properly.
4. Install:
Fuel tank
Refer to "FUEL TANK" on pa ...