Yamaha YZF-R125 Service Manual: Checking the starter clutch
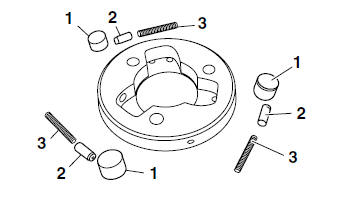
1. Check:
- Starter clutch rollers "1"
- Starter clutch spring caps "2"
- Starter clutch springs "3"
Damage/wear  Replace the starter
clutch
assembly.
2. Check:
- Starter clutch idle gear
- Starter clutch gear Burrs/chips/roughness/wear Replace the defective part(s).
3. Check:
- Starter clutch gear contacting surfaces Damage/pitting/wear Replace the starter clutch gear.
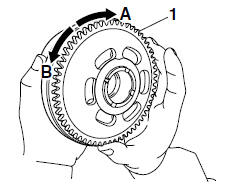
4. Check:
- Starter clutch operation
a. Install the starter clutch gear "1" onto the starter clutch and hold the generator rotor.
b. When turning the starter clutch gear clockwise "A", the starter clutch and the starter clutch gear should engage, otherwise the starter clutch is faulty and must be replaced.
c. When turning the starter clutch gear counterclockwise
"B", it should turn freely, otherwise
the starter clutch is faulty and must be replaced.
 Removing the starter clutch
1. Remove:
Starter clutch bolts "1"
NOTE:
While holding the generator rotor "2" with the
sheave holder "3", remove the starter clutch
bolts.
Do not allow the sheave holder to touch th ...
 Installing the starter clutch
1. Install:
Starter clutch assembly
Starter clutch bolts "1"
NOTE:
While holding the generator rotor "2" with the
sheave holder "3", tighten the starter clutch
bolts.
Do not allow t ...
Other materials:
Installing the rear shock absorber assembly
1. Install:
Rear shock absorber assembly
Relay arm "1"
NOTE:
Install the relay arm as shown in the illustration.
2. Tighten:
Rear shock absorber assembly upper nut
Relay arm nut
Rear shock absorber assembly lower nut
3. Install:
Connecting arms
NOTE:
When ins ...
Assembling the front wheel
1. Install:
Wheel bearings
Oil seal
a. Install the new wheel bearings and oil seal in
the reverse order of disassembly.
CAUTION:Do not contact the wheel bearing inner
race
"1" or balls "2". Contact should be made
only with the outer race "3".
NOTE:
Use a socket " ...
Checking the connections
Check the leads, couplers, and connectors for
stains, rust, moisture, etc.
1. Disconnect:
Lead
Coupler
Connector
2. Check:
Lead
Coupler
Connector
Moisture → Dry with an air blower.
Rust/stains → Connect and disconnect several
times.
3. Check:
All co ...